Grandma's Mason Jar
Propagating Roses by Rooted Cuttings
Master Rosarian
Everybody has a story to tell of how their grandma would stick a piece of rose stem into the ground and then place a Mason Jar over the stem to make it grow. There are tales of how the early American settlers of the 1800's traveled to the far reaches of the wild west in covered wagons, with grandma bringing along "starts" of her favorite roses from back home. Perhaps the treasures of these "monsters on wooden wheels" were raided, and they discovered the Yellow Rose of Texas hiding under the bonnets of the women. Or maybe the settlers used their precious "starts" to barter for provisions along the endless dusty trails.
Rose propagating methods have changed over the years, from the simple own-root varieties of the Victorian era, and progressing to the budded hybrids of the 20th century with its many options of exotic understock such as Rosa multiflora, Dr. Huey, Manettii, and Fortuniana. Now, rumor has it that many of the modern hybridizers and commercial growers are interested in returning to the simplicity of yore. Today's commercial rose growers are finding that budded roses are just too labor-intensive and expensive to produce. Because of this, it appears that we can look forward to more own-root roses being introduced and sold at our local nurseries in the future. Own-root roses will eliminate suckering and hopefully will eventually help to eradicate mosaic virus.
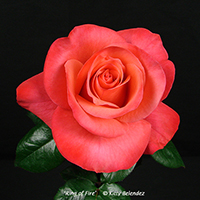
Although miniature roses have always been grown on their own roots since the 1950's when they were first introduced, Ralph Moore of Sequoia Nursery in Visalia, CA, near Fresno, offered many of the larger roses on own-root along with his vast selection of minis. His Playgirl floribunda has always been sold by Ralph as own-root cuttings in 4-inch pots, as well as a good assortment of other own-root floribundas and old garden roses. Unfortunately, Mr. Moore is now deceased and his nursery is closed.
Heirloom Roses of Oregon, offers a huge catalog of old garden roses and shrubs that are mostly grown on their own roots. The plants may look puny when you first receive them, but it doesn't take long before they are up and running as fast as their budded counterparts in the garden.
So grandma had the right idea in the first place, and she really did know what she was doing. It has always been fun to start roses from cuttings. Some people get their kicks by going "rose rustling" in the deserted cemeteries of old and forgotten mining towns. Others just take a twig from their favorite rose and stick it into the ground in their backyard. There is nothing complicated nor scientific about taking cuttings of roses and rooting them to "start" a new plant. There are various ways of taking rose cuttings, so let's tell you how.
Stick in the Mud Method: I know of some people who have simply stuck the rose cuttings in the ground without covering it with a jar, and they have had some success. This method works best in mild climates with good soil.
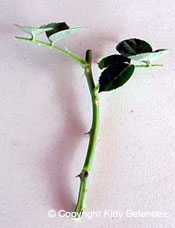
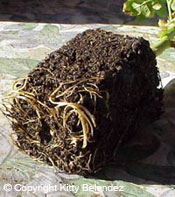
Grandma's Mason Jar: The success rate of this method is POOR. For the beginner this is probably the easiest way to take rose cuttings. Not much equipment is needed, just a clear quart-size glass jar and some cuttings from your favorite rose. For you modern sodapop lovers, a 2-liter plastic bottle with the bottom cut off will work just as well. Cut a piece of rose stem about 6 inches long, remove the bottom set of leaves, and just stick the stem into the ground (or into a pot) a couple inches deep, and cover with a jar or bottle. You will need to periodically water the soil around the jar, otherwise the rose stem will dry out. It will take a couple of months for the rose stem to take root and begin leafing out with its new growth. The best time of year is spring or early fall. If you live in a mild climate, then winter and summer can also be successful for rooting roses. Intense summer heat of 100 degrees is not conducive for taking rose cuttings, nor are 32 degree or below winters.
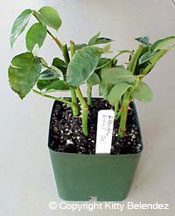
The Baggie Method: The success rate of this method is POOR. This was the first method I ever tried. Here you fill 2-inch plastic pots with potting soil, insert the rose stem halfway inside the pot, then put the pots into a one-gallon plastic zip-lock bag. You can get four 2-inch pots into each gallon bag. I didn't like this method because it caused many of the cuttings to rot since the bags tended to fold over and therefore prevented the air from circulating It may be helpful to place a couple of small sticks inside the bag to help keep it upright and full of air.
The Misting Method: As you get more sophisticated in your rose propagating methods you may eventually want to set up a misting bench. It can be an open-air bench or one enclosed in a greenhouse, or even a small misting box, similar to the one my husband Bob built for me. (Refer to "How We Made Our Misting Box," from Rose Ecstasy. You could choose to rig it up with a manual or an automatically-timed mister, whatever your time, money, or expertise will allow. I am fortunate to have a very handy guy for a husband, who is a good sport whenever I come up with these crazy project ideas.
When we first set up our mister, we installed two battery-powered timers, as each one only had four times per day that it could turn on. The first model we purchased could not handle our very high water pressure of 120 psi and kept exploding. Other models we tried were just not dependable in coming on every hour, and the batteries often failed.
Now we are trying the Mist-a-Matic system. We got ours as a hand-me-down from an elderly rosarian friend who retired to a nursing home. A new one from might cost $350 or more.
A special stainless steel screen on the handle of the unit raises up when it is dry. When this happens, it throws the mercury switch which opens the solenoid valve and starts the misting cycle. When this stainless steel screen accumulates enough mist, the weight of the water drops it down again, shutting off the mercury switch, closing the solenoid valve. It needs practically no care or maintenance and can be left on, unattended day and night. This control unit is a very practical instrument which will have a long lifetime of carefree maintenance. There are no clocks to adjust, and it is not affected by water conditions. It works simply on the weight of water. The major benefit of the Mist-a-Matic is to control the misting cycle according to weather conditions. Too much water promotes disease and wastes water. Too little water causes leaves to wilt and failure to root. The Mist-a-Matic distributes the correct amount of water. In hot weather, the unit will turn on more frequently as the water evaporates. In cooler weather, the unit turns on less frequently. For operation, you will need to plug the unit into an electrical outlet. You need to hook it up to a water source with misting nozzles.
Planting Mediums: The planting medium that I have found to be the most successful for rooting rose cuttings is a 50-50% blend of potting soil and perlite. This is a very light blend that encourages the roots to grow quickly. Others have used blends of sand or vermiculite with some success.
Other Tips for Rooting Cuttings:
- Use sharp cutters to prevent crushing the rose stem.
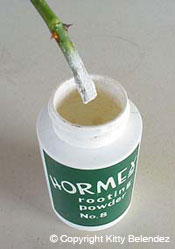
- Rooting hormone is optional; success rate is much better with it. Powdered Hormex #8 is preferred.
- Label your rose cuttings with their proper name.
- It takes 4 to 8 weeks for the cutting to root, depending on the weather and the rose variety.
- Keep the rose cuttings moist at all times, with good air circulation and sunlight.
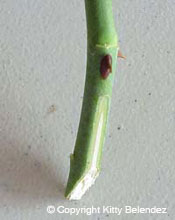
- Make slits in the bottom inch of the rose stem to encourage more rooting. I scrape off some of the stem with a knife.
- Make sure the pots are very clean before using them, especially if you are reusing them. Wash them out with soap and hot water. An automatic dishwasher works well for cleaning small pots.
- The rose cuttings will root faster when placed in full sun.
NEW OR OLD WOOD?
I have successfully taken rose cuttings with both new and old wood. It is important to let the new stems sufficiently mature. The new wood is usually mature enough after the stem has just finished blooming. If you don't let the stem mature enough, then it usually becomes limp and will die before you can get it to root. I take cuttings from new rose stems in the spring right after the first bloom cycle. Then in early to late fall (in Southern California) I prefer to use more mature or old wood. When using old wood in the fall, I will remove the rose cuttings from the Mason jar, baggie, or mister, after only several weeks since it is cool enough then for them to root on their own as long as I water them daily.
Originally published in "Rose Ecstasy," bulletin of the Santa Clarita Valley Rose Society, Kitty Belendez Editor.
LINKS TO MORE INFORMATION ON ROSE PROPAGATION:
LINKS TO MORE ARTICLES ON THIS WEB SITE:
03.30.01
Photos © Copyright Kitty Belendez
© Copyright Kitty Belendez. All rights reserved.
For questions about
Santa Clarita Valley Rose Society, contact: